Space Planning for Control Rooms: Back‑to‑Back, Open T, Open X & Closed Pods
- Axel Trujillo

- Mar 16
- 4 min read
Updated: Mar 20
Why Pod Geometry Drives Performance
In 24/7 operations, floorplates are more than square footage—they are communication systems. The geometry you choose (rows, pods, and mixed shapes) governs sightlines, handoffs, noise control, and service access. Sustema’s Transit Linear & Cockpit consoles are designed to repeat in pods—Back‑to‑Back, Open “T”, Open “X”, and Closed—so you can scale one proven unit across the entire room and still support specialized roles.
The Four Pod Archetypes (At a Glance)


Pod Type | Best For | Collaboration & Sightlines | Cabling & Service Notes |
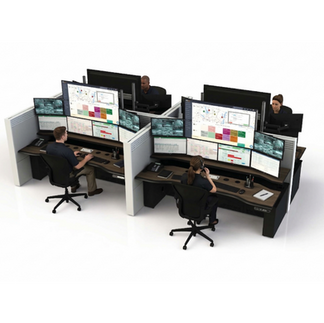
Back‑to‑Back (mixed shapes) | High‑density rows (PSAP floors, utility NOCs) | Strong forward sightlines; supervisors can scan aisles | Central raceways; plan aisle widths for hot‑swap/side service |
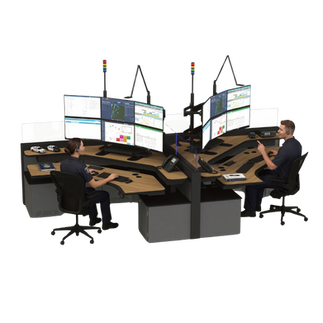
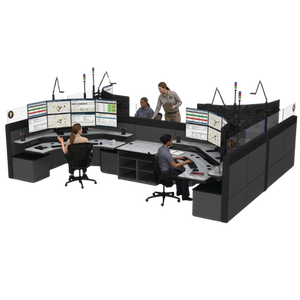
Open “T” | Incident cells; cross‑functional teams | Central nexus improves multi‑party handoffs | Short runs to common power/data; keep center clear for movement |
Open “X” | Event surge desks; triage teams | 360° visibility; fast pivot between peers | Four‑way power/data branching; mind cable crossings |
Closed Pod | Focused analysis; switching tasks | Higher lateral privacy; glare control | Perimeter cabling; add removable panels for service continuity |
Pods can be repeated and mixed—for example, a Back‑to‑Back core with Open “T” collaboration nodes at the perimeter.
Start with the Work: Roles, Lines of Sight, and Reach
PSAP/9‑1‑1 & EOC: Group call‑takers and dispatchers in Back‑to‑Back pods for clear forward sightlines and quick supervisor access; reserve Open “T” areas for incident coordination. Cockpit consoles help when operators manage dense display arrays that benefit from focal‑adjustment capability (not shown below).

Utilities (Grid/SCADA): Long row Back‑to‑Back layouts allow supervisors to scan operators and wall displays; add Open “X” or Closed pods for outage analysis or switching authority. Linear consoles scale efficiently in row‑based rooms (not shown below).

Related reads: Monitor mounting options for command center furniture.
Fit‑for‑Purpose Footprints: Widths & Depths by Pod
Before you lock pods, confirm each station’s width and depth against operational loads:
Widths: 72" / 84" / 96" (limited 48"/60" models for constraints). Wider spans support more equipment and multi‑level arms without crowding the primary reach zone.
Depths: 36‑30 / 36‑36 / 36‑42—depth dictates CPU capacity, airflow, and side‑service clearances, especially when pods are tightly packed.

Power & Data: Wall Systems That Keep Pods Clean
Reliable pods demand disciplined cable pathways. Two wall options work beautifully in pod‑based plans:
HD Walls — integrated power & data raceways (horizontal and vertical), with removable finishing panels for clean service access across the pod. Ideal for Back‑to‑Back rows or layouts with heavier cabling.
Lite Walls — a slimmer profile with instant outlet access while preserving a tidy, panelized appearance. Useful where aisles are constrained or pods must fit tight geometry.

Deep dive on cable management wall systems for control consoles.
Serviceability: Keep Aisles and Panels in Mind
Maintain clear aisle widths behind and between pods; factor door swings and column offsets early.
Use cabinets with lockable, ventilated doors and add low‑noise thermostatic fans for high heat loads. Sliding CPU shelves (side or center) reduce mean time‑to‑service.
Favor panelized solutions (HD/Lite removable finishing panels) to access raceways fast during incidents.
Deep dive on technology integration in control room furniture.
Ergonomics & Environmental Control Within Pods
For dense screens or long surveillance intervals, Cockpit with focal‑adjustment helps operators fine‑tune viewing distance and height on the fly.
Add PES 360 options—task/status lighting, base heaters, surface‑integrated cooling fans—so each position can self‑calibrate comfort without changing the room AC setpoint.
Deep dive on the personal environment system for control console furniture.
Example Pod Patterns by Mission
PSAP Core: Back‑to‑Back Rows + Open “T” Incident Nodes— Why: Fast supervisor scanning; short paths to team huddles during spikes.— Spec Tips: Linear or Cockpit depending on display density; 84"/96" widths for call‑taking; HD walls for shared raceways; PES 360 task light per seat.
Utilities Transmission: Long Back‑to‑Back Spans + Closed Pods for Switching— Why: Clear sightlines across the grid wall with privacy for high‑risk switching.— Spec Tips: Linear 96" × 36‑42 for equipment capacity; HD walls for long runs; sliding CPU shelves; fans where heat maps demand.
Water/Wastewater SCADA: Mixed Open “X” Collaboration Pods— Why: 360° visibility for alarms and cross‑functional briefings.— Spec Tips: Combine Lite walls (tight rooms) with 84" stations; choose monitor arms for multi‑level arrays up to 50" displays.
Aisles, Acoustics, and Lighting
Aisles: Prioritize safe egress and cart passage behind pods; align power/data drops with pod seams to reduce under‑foot runs.
Acoustics: Use Closed or angled end gables to reduce lateral noise and glare at pod extremities.
Lighting: Pair mid‑tone surfaces with darker trims to minimize reflected glare within pods; complement with task lights for operator control.
Different finishes & branding options help segment pod types and wayfinding without adding walls (edges, laminates, powder coats, engraved or LED-lit logos). See finishes & edging options for control consoles.
Implementation Playbook
Define mission cells (call‑taking, dispatch, SCADA ops, outage command).
Select the pod archetype(s) that best match workflows (Back‑to‑Back, Open “T”, Open “X”, Closed).
Map widths/depths per seat—72/84/96" and 36‑30/36‑36/36‑42—to equipment and reach.
Engineer cabling using HD or Lite walls and plan service aisles with removable panels.
Lock display strategy (arms, mounts, large displays up to 50"), verifying sightlines across the pod.
Specify PES 360 and ergonomic details by shift feedback (task/status light, heaters, cooling).
Finish & brand for visibility and wayfinding (edges, laminates, powder coat, logos).
Ready to lay out your floor? Book a space‑planning consultation or request a quote—we’ll translate mission workflows into repeatable pods with disciplined cabling, operator comfort, and fast service access.


Comments